If you use your bandsaw too often, the blade might bend or break in the event. Actually, bending and breaking of the bandsaw blade always come with the job.
Instead of buying a new blade for your bandsaw, you can opt to weld it. Nevertheless, you need to understand how to weld bandsaw blades properly.
It is also important to follow the right steps of how you can weld bandsaw blades with a welding machine. If you don’t do it appropriately, it might not come out as expected. Also, you might end up damaging the blade further.
Luckily, this article is meant to help you understand how to weld bi-metal bandsaw blades.
Table of Contents
What Do You Need?
Before we get started, let’s first look at the things that you will require in the process of welding the bandsaw blade.
Here are the items that you must have at hand;
- A vise
- Tig welder
- Grinder, and
- Your broken bandsaw blade (of course)
Once you have these items, you should be ready to start welding the blade. Also, ensure that you wear the right safety gear even before you start working on the broken blade. Safety is always mandatory in the workshop or whenever you are working with a power tool.
Ideally, wear protective gloves and some safety glasses to keep you safe from debris and small chips.
Let’s Learn How to Weld Bandsaw Blades Easily
Now you should be ready to start welding the bandsaw blade. Here are the steps on how you can weld bandsaw blades with shop welder.
Step One: Inspect/Prepare the Blade
First off, you will need to inspect the condition of the blade before you start welding it. The blade must be strong enough to endure the welding process. If it is worn out, it might not last after welding.
Suppose the blade is broken due to too much rust buildup, you shouldn’t proceed to weld it. But if it is in a good condition, you can go ahead with the process.
You can then use a degreasing agent to clean the blade. Preferably, spray the agent on each end of the broken area and allow it to sit for around ten minutes. You can then use a damp cloth to wipe it clean.
If it is too greasy, soak the blade in soapy water to dissolve the grease. Also, don’t use corrosive soap as it might damage the blade.
Step Two: Grind the Blade
After cleaning the blade as needed, grind it to make the broken ends adhere to each other tightly after welding the blade. Ensure that you grind gradually and lightly on the broken ends. Also, use a vise to grind at an angle so that each end overlaps when you weld.
Grinding also helps to strengthen the blade after welding. After the grinding process, place back the two pieces in the vise so that they are almost overlapping.
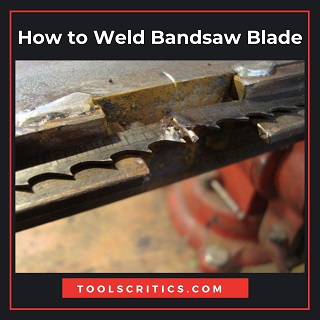
Step Three: Welding the Blade
Out of the three steps we have covered here, welding is the quickest of them all. At this stage, what you should highly consider is touching the ends of the blade tightly together. Normally, the blade will be weak if the ends are not touched tightly.
However, proper care is needed here since it can damage the blade if not done appropriately. Make sure you weld the other side of the blade like the first one. It actually adds some strength to the blade when you weld on both sides.
Check the video to learn In-depth.
Once you are done, counter-check that both ends are welded and retouched correctly.
What Next?
So, now you have welded both sides of the blade. What next should you do? Now that you have followed the proper steps of how easily you can weld bandsaw blades with shop welder, you’ll have to anneal it using a blow torch. Annealing the blade with a blow-torch helps to improve its strength by enhancing the bond.
You will need to let the blade cool down. Once it is cooled down, inspect the blade for any irregular spots. If you find any, make sure you polish them to keep the blade’s surface smooth enough.
Here, you can use a grinder to smooth out the irregular spots. Just make sure you do it lightly to avoid damaging the surface of the blade. If need be, you can also clean the blade again by wiping it down using a damp cloth.
By now, your blade should be ready to get to work again. You can then re-install it onto your band saw. However, you should keep in mind that the blade is still prone to breakage or other damages if you use it frequently.
If it breaks again, you might opt to buy a new blade.
For regular maintenance, ensure that you lubricate the blade after each use. Plus, check that you clean any grease buildup or any other debris on the blade. Such buildups tend to compromise the quality of the blade.
FAQs
Q. Is Welding A Bandsaw Blade Worth It?
Ans. That depends on your priorities and budget. If you are the kind of person that is budget sensitive, you might find welding to be a reliable option. This is because welding the blade is much cheaper than going for a new blade. As long as you have the right resources at your disposal, you can easily weld the blade without any issue.
Conclusion
Whether you want the steps on how to properly weld morse bandsaw blades or you just want to know the right way to weld any other bandsaw blade, this guide should help you with it. As you prepare to weld your blade, ensure that you follow the steps keenly. Also, be gentle on the blade at each step for you to avoid damaging it even further.
If the blade is worn out or in a bad condition, you don’t have to waste your time trying to weld it. Instead, just replace it to avoid the hassle. Above all, remember to wear some gloves and protective goggles as you weld the blade to avoid unnecessary injuries.