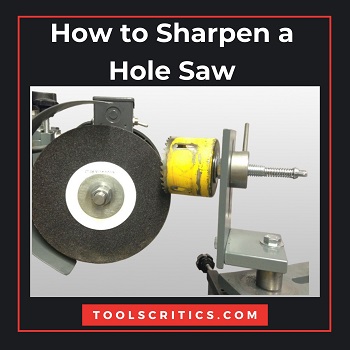
A hole saw, also known as a drilling tool, is used to make round holes on various surfaces like soft metals and wood. Teeth aid its functionality in its cylindrical structure which often becomes blunt. The sharpness of its teeth determines the saw’s effectiveness and if you don’t know How to Sharpen a Hole Saw that could be riskier for you.
When they are blunt, they do not perform their tasks efficiently. In most cases, they rip the material on which the holes are made, and as a result, the resulting holes are unpleasant and cannot be used for the intended purpose. Sharp saw teeth enhance precision and accuracy in the hole drilling process. Markedly, there is a need to sharpen these tools to enhance their efficiency and reliability.
Table of Contents
5 Easy Steps: How to Sharpen a Hole Saw
Sharpening hole saws can be challenging. Here are steps on how to sharpen a hole saw.
Step One: Set up the Hole Saw in a Universal Sharpener
First, set the hole saw in the drill end of the universal sharpener. The section may be detached, and hence it is crucial to fix and tighten it before using it. This end features a twisting head that revolves to secure different lengths. Use the sharpener’s key to tighten the grip.
Additionally, you should ensure that the tightness does not exceed the limit. Do not force or over tighten this area as it can result in damaging the section that drills the surfaces in question. Ultimately, this will hamper the functioning of the saw.
Step Two: Set up both the sharpener and the saw
Loosen the sharpener’s revolving head and gently place the saw’s drilling teeth on the sharpening blade. Tighten the screw knob to ensure stability and firmness of the saw. In turn, this reduces any movement during the sharpening process. Adjust the teeth using the angle changer until they fit well on the sharpening blade.
Step Three: Mark Starting Point
The sharpening process involves complete revolutions. It is difficult to identify the starting and ending point. Thus, at this point, use a permanent marker to indicate the starting point. This will minimize the chances of over-sharpening some teeth and under-sharpening the others. With each revolution, you will identify a complete circular motion.
Step Four: Hose Adjustment
Set the hose adjustment fitting under the saw and blade. The fitting helps in trapping metal dust which is the main dirt during the sharpening process. With this adjustment in place, your surrounding environment can be kept clean. Thus, you will not inhale these particles.
Step Five: Start Sharpening Machine
In this stage, you are equipped to start and progress in the sharpening process. Power the sharpening machine as you press the saw against the machine’s blade. You should hold for 2 to 4 seconds before moving to the next tooth.
Follow the same steps for all the teeth. Ensure you repeat these steps until you reach your marked area. Power off your sharpening machine and check the results of the exercise.
You can watch the video also to learn more about the process.
Other Mechanisms of Sharpening Hole Saws
- Using Hand File
A hand file is used manually to sharpen each tooth in the hole saw. The most recommended files for such types of tasks are the small diamond files. The results from this file are reliable if the saw has not dulled up completely. However, the demerit of this technique is its time-consuming nature.
- Using a handheld electric grinder
If you own a handheld electric grinder, you can utilize it in sharpening your hole saw. Grinders are faster than hand files as they incorporate the electric aspect. However, using these grinders still requires a lot of time and concentration.
- Using Bench Grinder
In this case, you attach the hole saw to the grinder’s rotatable vice. You then position the saw’s teeth in the bench grinding wheel. This process restores the saw’s sharpness. However, it requires extra concentration and more time for positive results.
Depending on the frequency of sharpening the hole saw’s teeth, they can end up hardening to the extent that sharpening them will not help. This explains why most people prefer to replace the hole saws rather than sharpening them.
Besides, this type of saw is considered low-cost. This attribute encourages the users to engage in more replacement than sharpening.
When purchasing a hole saw, it is recommended to go for one with a replaceable arbor. This will give you an alternative of sharpening when necessary and replacing when sharpening is not an alternative. Thus, this will help you save on replacement costs and enhance the durability of the hole saw.
Final Words
Whole saws come in handy when dealing with both DIYs and professional woodwork. Most hole-saw reviewers recommend that owners invest in the best hole saw kit for durability and efficiency. Depending on the frequency and number of tasks these saws handle, they are bound to become blunt. Thus, it is prudent to include hole saw sharpeners in this kit.
Both newbies and professional experts can utilize the hole saws. Both parties will encounter bluntness in their line of duty. Apart from learning how to use a hole saw, owners should also learn how to sharpen a hole saw by hand. These skills play a major role in the outcome of the hole saw projects. Using the above steps, you can sharpen these tools single-handedly. You don’t need the services of an expert for this process, and as a result, you will save more and enjoy your tasks.
Let me ask anything related to sharpening a hole saw in the comment section, I will try to help you out.